
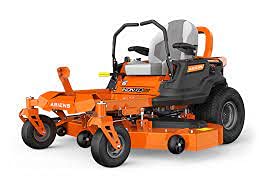
Finding a specific zero-turn mower made in USA can be time-consuming. (Below) After some research, I’ve put together a helpful list with pictures of zero-turn mowers made in the USA and conveniently available online.
Related Pressure washer made in USA
For more on pressure washers made in USA read the full article.
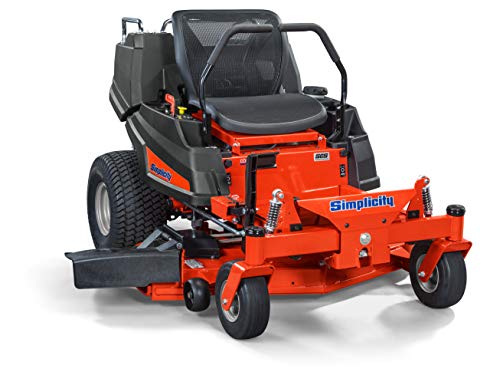
Simplicity Courier Zero-Turn Mower (5 Features Explained)
1. Automatic Choke
One of the excellent features of the Simplicity Courier zero-turn mower is the automatic choke. For example, no matter the throttle position, the mower will automatically choke if necessary. It’s unique how easy it starts compared to other high-end zero-turn mowers.
2. Suspension
Simplicity is becoming a brand known for its quality, especially its suspension design. For example, this mower has two fronts and two rear independent shocks suspension. In addition, the seat has two springs that add to an even more comfortable mowing experience.
Related Garden hose made in USA
For more on garden hoses made in USA read the full article.
3. Deck
The cutting height of the deck ranges from 1.5 to 4.5 inches. The deck has Simplicity rollers on it. However, it is not an actual free-floating deck and is more of a suspended deck style. For example, if your front tire goes into a hole in your yard or a huge pothole, the deck will follow the wheel. So, if you have a pretty smooth yard, you’re not going to notice any difference.
But if you have a yard with many bumps or divots, it won’t mow as well as an actual free-floating deck. Still, the Simplicity Courier zero-turn mower is an excellent machine, as good as any mower on the market. You’ll be amazed at how well this mower rides and cuts for a residential machine.
Related Bottle jack made in USA
For more on bottle jacks made in USA read the full article.
4. Seat
Another feature of this zero-turn mower is its comfortable mesh seat. The mesh seat design of this mower will keep you cool during summer days, giving you more comfort when mowing your property. As I mentioned earlier, the seat has two springs that add more comfort to the riding experience on rough terrain.
5. Cargo Bed
The Simplicity Courier zero-turn has a rear-loading platform that will be very useful for transporting material. In addition, the loading bed can dump, which allows you to unload the material quickly.
Related Bench grinder made in USA
For more on bench grinders made in USA read the full article.
How to Pick the Right Zero-Turn Mower (With 7 Helpful Tips)
Whether you’re upgrading your current zero-turn mower or looking to purchase your first mower, these seven essential tips (below) will help you choose the ideal zero-turn mower for your needs.
1. Model and Specs
If you are upgrading your zero-turn mower, make sure you know the model and specifications of your current mower. For example, try to find out these features on your current zero turn mower.
- Engine
- Transmission
- Deck size
- Speed
Having this information before you start shopping will ensure you get a mower as good or better than your current one. And it will give you a great reference to start comparing other mowers to your current zero-turn mower.
Related Pellet grill made in USA
For more on pellet grills made in USA read the full article.
2. Know Your Specific Needs
Knowing your specific needs may seem simple enough, but most people don’t take into account key factors such as:
- How soft is your terrain?
- Do you need a zero-turn that has suspension?
- Does your property have steep hills?
Detecting these key factors is essential because if your property has pretty rough terrain and probably you’re going to be going at high speeds. For example, going on a zero-turn mower at speeds of 7 to 10 miles per hour and at the same time mowing can be a very rough ride, depending on what type of land you have.
Also, if your property has very steep hills, that can be a big problem as well. Many people end up string mowing their hills because their mower can’t handle it. At the same time, they could buy a mower that could have handled those hills and drastically decrease the time it takes them to get their grass mowed.
Related Air compressor made in USA
For more on air compressors made in USA read the full article.
3. Know Your Budget
Make sure you know your budget because you probably won’t be able to find a zero-turn mower that does it all for the cost you want. Most residential zero-turn mowers can cost around $3,000 and go as high as $5,000. Honestly, I don’t expect to find anything substantial for less than $3,000.
Now, suppose you mow around three acres. In that case, I suggest you consider looking at high-end residential mowers or entry-level commercial mowers. And if you mow more than five acres a week, look at commercial mowers. Commercial mowers run much faster, have more gas capacity, and are built to handle that kind of workload.
Related Cordless tools made in USA
For more on cordless tools made in USA read the full article.
4. Know What Attachments You Need
Zero-turn mower attachments will make your mowing experience much easier and more effective. For example, you may need a bagger, mulching blades, headlights, or a rack. In any case, if you know what attachments you need ahead of time, you can include them in your budget.
5. New Mower vs. Used Mower
Buying a used mower can be an excellent way to get commercial quality for a residential mower price. It can also expand your budget to get the necessary attachments. However, all too often, people buy a used mower and end up spending so much money fixing it up that they could have purchased a new mower in the first place.
6. Ask About Warranty
Typically on zero-turn mowers, there will be a manufactured and transmission warranty. Husqvarna’s Z200 series zero-turn mowers have a manufactured deck that also comes with a limited lifetime warranty. I recommend the Husqvarna Z200 series for anyone looking for a zero-turn mower for around $3000.
7. Build Quality
When shopping for a zero-turn mower, one way to know which mower is the best fit is to compare significant components. See which mower has the perfect build quality, the largest engine, and the largest transaxle. Two thousand series transmissions are considered residential. And 3000 series transmissions are considered commercial and above.
Suppose you go with Kawasaki engines, one of the most popular types of engines. In that case, they are classified by letters including:
- FR: It’s residential.
- FS: Between residential and professional.
- FT: Between residential and professional.
- FX: It’s professional.
Related Floor fan made in USA
For more on floor fans made in USA read the full artile.
How to Operate a Stand-On Zero Turn Mower (Helpful Guide)
Stand-on zero-turn mowers will have six different main things located on the top platform, including:
- Control Arms: With the control arms, you can rotate the mower left, right, forward, reverse, and of course, a zero-turn.
- Power take-off (PTO): The PTO mechanism is to start the rotation of the cutting blade and, at the same time to brake and stop the blade when the clutch is switched off.
- Throttle: You can start the mower and have complete control of the speed with the throttle.
- Parking Brake: The parking brake will stop the motor from going forward and backward.
- Deck Lift Assist: Some walk-behind zero-turn mowers have a manual or electronic button to adjust the deck height.
- Ignition switch: This is a simple function to start the mower engine by turning the ignition switch to the on position.
You can start operating your zero-turn mower now that we have covered stand-on zero-turn mower basics. First, start the mower and let the parking brake release. If the parking brake doesn’t release, what happens is that usually, there is a safety feature either on the handles or on the deck platform. And the mower won’t engage the blades if the parking brake is not released.
Also, if you’re not standing on the mower and you have your hands on the safety switch, you’re not going to be able to engage the blades.
How to Operate a Sit-Down Zero-Turn Mower (Helpful Guide)
If you’ve just bought a new zero-turn platform, regardless of the brand, they’re all going to have the exact mechanism for the most part. You will have the same controls but on a seated platform versus standing zero turns.
- Controls: Left, Right, double arm backward is reverse, the double-arm front is going forward. And if you want to do a zero-turn, go backward, i.e., right arm backward and left arm forward simultaneously. Once in the neutral position, the mower will not move forward.
- Parking Brake: The parking brake lever is located on the left or right, depending on your zero-turn model. Be sure to disengage the parking lever before bringing the zero-turn mower arms together; otherwise, the engine will shut off.
- Control Panel: Most zero-turn mowers have the control panel on the right or left side. The control panel may include an hour meter, oil temperature, fuel level, power take-off, ignition switch, and choke. So, once you start the engine, release the parking lever and bring the zero-turn arms together to begin operating your mower. To make a K-turn when using a zero-turn, you’re going to go all the way down and then turn left or right and stop. And then back up and turn back in, and that’s how you line up in the next lane.
How to Properly Pressure Wash Your Zero-Turn Mower (In 4 Easy Steps)
Whether you are cleaning your mower because it is the end of the season or for resale, here are the recommended tools you will need for best results:
- Air compressor with an air wand.
- Pressure washer.
- Automotive soap.
- Portable soap sprayer.
1. Use an Air Wand
There will be a lot of grass, dirt, and dust all over the mower, so using an air wand will help speed up the cleaning process. For example, the zero-turn mower will accumulate grass, dirt, and dust under the seat where all the electrical wires are located, including the engine area. Again, the easiest way to get the grass, dirt, and dust out of the electrical and engine area is to blow air first.
Another benefit of blowing air to your zero-turn before washing is that removing grass from the engine and transmission will help keep the machine cooler. Accumulated grass can block airflow, causing the engine or transmission to overheat.
Most zero-turn mowers have an independent transmission, so be sure to blow enough air on both sides of the mower. When you pressure wash a zero-turn mower without air blowing it first, the water is just going to push the grass, and it’s going to clump up somewhere else that you can’t notice.
Another thing when using the air wand is to watch where you are going to blow the air first and then step back at the same time to avoid any grass, dirt, and dust from ending up in the face.
2. Drop the Deck
Mark the current deck platform height before removing the pin, especially when cleaning a customer’s mower. Because after cleaning, it will be easier to return the pin to the present height.
Once you have removed the pin, lower the deck to the lowest point so you can get a good even cleaning on the deck and continue blowing air as needed. Also, disconnect the discharge chute for better cleaning.
3. What Not To Do
Avoid pointing the tip of your pressure washer directly at any of the mower belts because that will cut the belts. The same goes for electrical components such as relays, wires, switches, the motor input, or any other electrical components that deal with the motor.
Now, even small pressure washers have enough power to start removing the decals. Still, it’s the same with the belt, and the electrical avoid directly pointing the pressure washer tip. Avoid spraying too much soap directly onto the engine intake or electrical wires. Also, avoid spraying the soap and then letting it dry; that is something you should not do because it could damage the paint on your zero-turn mower.
4. Start Washing
Any automotive soap with a handheld foam sprayer will be good enough to wash your zero-turn. I always recommend automotive soap because it does not fade the paint on your mower. Start applying the soap from top to bottom and make sure the front wheels are in the out position for a better clean.
Next, start pressure washing, slowly do a gentle pre-wash and walk around first. Gently wet the entire mower because sometimes the soap will only be in one area, so move the soap around and let it penetrate a little further. Then start doing a heavy wash from top to bottom.
Washing Underneath the Deck: This process is simple, and all you need is a zero-turn jack to lift the front end. Once the front end is lifted, blow air as needed, and you may need to scrape it with a putty knife and then add some soap and pressure wash it.
In general, it is always a good idea to lubricate your zero-turn mower after a good wash to prevent any rust and corrosion build-up.
Zero-Turn Mower Service Guide (In 11 Easy Steps)
Before beginning any routine maintenance on your zero-turn mower, refer to the owner’s manual and always use the proper tools and parts for the job. Tools you’ll need:
- Mechanic’s work gloves.
- Safety Glasses.
- Two Wrenches sized to battery terminal bolt and nut.
- A 3/8″ extension.
- A3/8″ ratchet.
- Pliers.
- An oil drain pan.
- An oil funnel.
- A zero-turn blade stop tool.
- A half-drive foot-pound torque wrench.
- A half drive socket sized to the blade bolts.
- A double o-grease and grease-gun.
- Shop towels.
Service Parts You’ll Need
- OEM spark plugs.
- OEM air filter and pre-filter if applicable.
- OEM fuel filter.
- Two or more quarts of engine oil, refer to the operation manual for engine oil specifications.
- OEM blades and blade bolts if needed.
1. Setting Up Your Zero-Turn Mower
Set the parking brake, disengage the PTO (power take-off), remove the ignition key, and lower the deck. Lift the seat and disconnect the negative battery cable; this prevents the engine from accidentally turning while you work and de-energizes the electrical system. Ensure the engine has cooled down before starting the maintenance process.
2. Spark Plug Replacement
First, remove the spark plug wire twist and pull it to inspect the wire for cracks or arcing damage. If you see any damage, replace the spark plug wire.
Next, put on safety goggles and use a compressed air nozzle to blow around the spark plug; this prevents dirt and debris from entering the engine. Next, use the ratchet and spark plug socket to loosen and remove the spark plug by turning counterclockwise.
Get a new spark plug and check and adjust the spark plug gap according to the engine manufacturer’s specifications. Screw the new spark plug by hand and then run it all the way in and tighten it a quarter of a turn. Reinstall the spark plug wire and repeat these steps on the other cylinder for V-Twin engines.
3. Air Filter Replacement
Remove the air cleaner cover and air cleaner aid if applicable. Put on safety goggles and blow out the intake using compressed air to blow dirt and debris from the air filter base and housing.
Never use compressed air to clean a filter because it can damage the filter and allow particles to pass through the filter into the engine. Install a new air filter and a new pre-filter, if applicable, and reinstall the air filter cover.
4. Fuel Filter Replacement
Inspect the fuel and fuel tank for debris and then clean, drain or flush the fuel out if necessary. Turn off the fuel valve; close and clamp the line to prevent fuel from flowing if your zero-turn mower is not equipped with an in-line fuel valve.
Use pliers to remove the fuel line clamps from the fuel filter and slide them back but leave them on the line. Then twist and pull the fuel line off the filter one side at a time. Install the new fuel filter in the correct direction of flow. If the filter has an arrow on it, point it toward the fuel’s flow into the carburetor. Use pliers to move the clamps back on the filter.
5. Engine Oil Change
Remove or open the dipstick to vent the engine crankcase. Place the drain pan into the engine drain port. Next, remove the drain plug and drain the engine oil into the pan. When the engine oil is completely drained, remove the pan and reinstall the drain plug.
Use the funnel to fill the oil to the top indicated on the engine dipstick and reinstall and tighten the dipstick. Then connect the negative battery terminal and start and run the engine for fifteen to thirty seconds. Recheck the oil and top up if necessary.Then disconnect the negative terminal again.
6. Adding Grease to Fittings
Use the grease-gun with standard double-zero grease to grease all the mower’s fittings, front end, and deck. Refer to the owner’s manual for grease point maintenance and intervals for optimum performance. If equipped, locate and pump several grease streams into the front axle zerk fittings and front wheel hub zerk fittings.
In addition, grease all deck mandrels if equipped with zerk fittings. As grease builds up, you will notice resistance in the grease-gun handle. When the resistance increases, you will know that the bearings and grease reservoir are complete, and you can move on to the next grease point.
7. Tire Pressure Check & Setting
People can adjust the tire pressure according to their personal preferences. As a general rule, the tire pressure on your zero-turn mower should be between 10 and 20 psi.
Some people prefer less pressure in the front than in the rear, and others prefer to keep the tires uniform throughout. Put on your safety glasses and use compressed air in the tire pressure gauge to check and adjust the tire pressure evenly on both sides. Adjust the tires to the psi recommended in the owner’s manual, and be sure to use the same psi from right to left and front to rear.
8. Deck Removal
Park your zero turn mower on a stable, level surface. Note that zero-turn mowers have an access hatch above the deck for ease of work. Remove the tension bolt to remove the belt around the motor or clutch pulley.
Next, remove the cotter pins, washers, and dowel pins from the deck lift arms. Also, remove the cotter pins, washers, and dowel pins from the rear cover brackets. Slide the cover under the zero turn and lean it against a wall for easy access.
9. Belt and Pulley Inspection
Check the deck belt and visually inspect the V-belt for weather cracks and dry rot, burnt spots, thin spots, or visible damage. Remove tension from the belt and rotate each idler to ensure the bearings are not tight or gritty; they should spin smoothly. Next, inspect the flat and V-belt idler for surface wear. Replace worn belts or pulleys as necessary.
10. Blade Replacement and Balance
Clean any debris and clumps of grass clippings under the cover with a flat screwdriver or chisel. Check the mandrel bearings from left to right and side to side and rotate them. Remove the blade bolts by turning the bolts counterclockwise. If bolts need to be replaced, I recommend using OEM bolts; refer to the owner’s manual for details.
Next, pull and inspect the blades; if the elevations are worn, thinning, cracking, or the corners of the edges are severely rounded, the blade needs to be replaced. Suppose the blades are still in good condition and need to be sharpened. In that case, I recommend taking them to your local dealer to have them professionally sharpened.
Next, reinstall the blades and position the blade lifters towards the deck with the star blade centered in the mandrels. Next, install the blade bolts by hand and tighten the blade bolts to 45 to 55 ft-lbs with a calibrated torque wrench. Use a blade stop tool to hold the blade while removing and installing the blade if necessary. If the mandrels have grease zerks, apply a little grease to them.
Ensure the belt is positioned correctly before placing the deck under the zero-turn mower. Once you slide the deck under your zero-turn mower, attach the front and rear hanger, lift arms, and reattach the belt around the engine pulley and clutch. Make sure that the tire pressure has already been checked and adjusted.
Next, place the mower in the highest cutting position on a level surface. Position the blades so that they are side to side and measure the distance from the bottom edge of the blade to the ground on both outer blades. The measurement should be the same on both sides.
Then place the front of the blades to back and measure the distance from the bottom edge of the blade to the ground on both blades. The measurement should be the same from front to back. It is okay to measure up to a quarter-inch higher at the rear; this is called deck pitch and creates a better vacuum. If the deck is uneven, check the tire pressure.
11. Test and Clean Up
Reconnect the battery’s negative terminal once you have completed all service procedures. It is helpful to clean the battery terminals and apply a terminal spray or dielectric grease to help stop corrosion. Start and test the engine and mower operation for a few minutes.
Engage the blades and give them a spin to make sure everything is working correctly. Recheck the oil level and top it up if necessary. And lastly, clean your zero-turn mower and the workspace.
Related Brand of tools made in USA list
For more on brand of tools made in USA list read the full article.